Friday, August 31, 2012
Friday fashion
Looking for more steampunk fashion inspiration? Check out Brian Kesinger (of Tea Girls fame)'s Tumblr blog.
Thursday, August 30, 2012
Studs in Pandora's hatbox
 Today I began applying the studs to Pandora's Hatbox. The studs I'm using are gold-coloured split pins that I bought from a scrapbooking supplies store. I bought them in two sizes, 8mm for the braids and 4mm for the monogram.
I'd originally planned to punch the holes for the pins with an awl, but I found that the shape of the round hatbox made this too difficult to manage and so I switched to a hand-held electric drill with a fine (2mm) bit instead.

First I drilled the holes through the braids on the sides of the hatbox, starting about 6mm (a quarter of an inch) above the base and spacing them evenly up the braid. As you can see from the image above, I stopped below the point where the lid will reach.
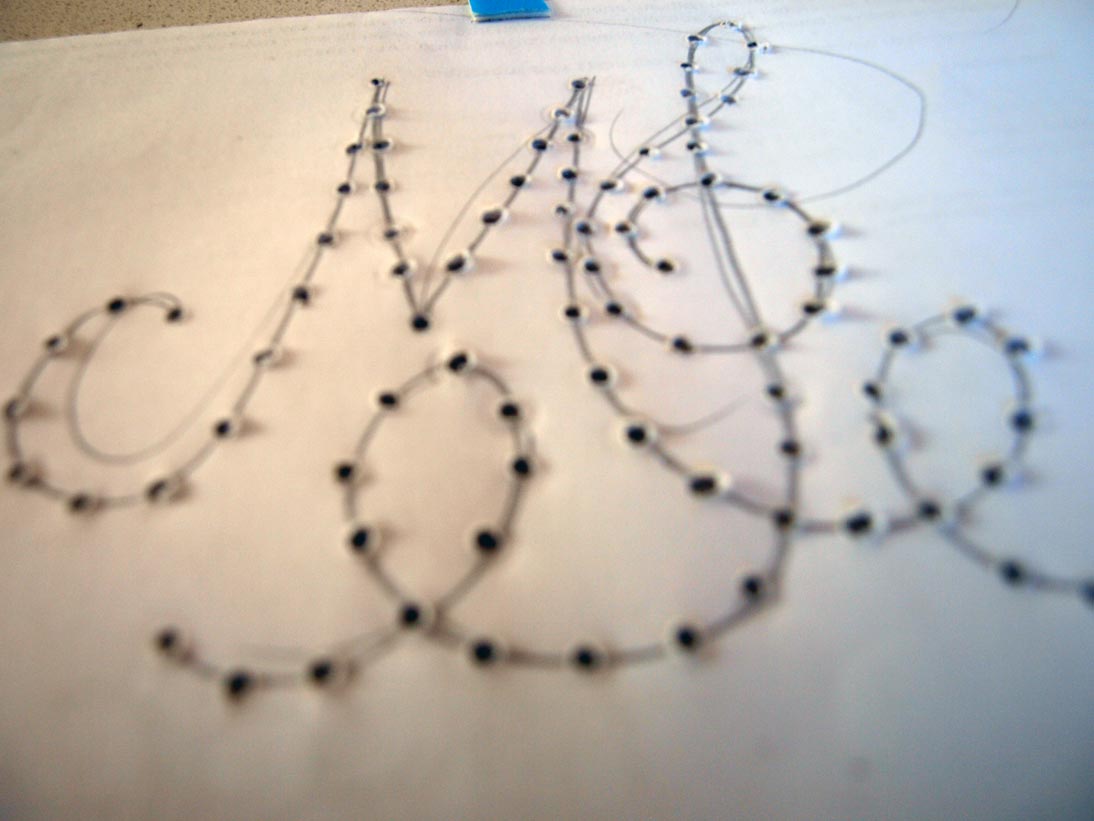 The next step was to refer to my my visual journal. I copied the monogram that I had sketched in the journal onto a sheet of scrap paper and taped it onto the centre of the hatbox lid. Then I drilled the holes for the studs right through the paper and the leather-covered lid.
The easiest part is placing the studs; simply push the split pins through the holes and flatten the tabs at the back to hold them in place. For extra security, I turned the lid over and laid it stud-side down on a folded towel, then pressed the tabs even flatter by tapping them with a tack hammer.


Wednesday, August 29, 2012
Postcards from the edge

Tuesday, August 28, 2012
Pandora's braids

 The next step in my faux Victorian leather hatbox is adding gold braid to replicate the brass strips that decorate the original object. I've chosen three different braids, including a woven braid with a line down the centre that will work to cover the edge of the lid.
I used a quick-grip clear adhesive to attach the strips, although they will eventually be secured with brass split pins as well. One long strip was glued around the top of the lid, with half of the braid left standing: once the glue has dried, I'll slightly gather the top edge of the braid so that it sits flat and evenly on top of the lid, before adding the brass split pins.
On the base, I cut strips of the different braids and applied them evenly around the barrel. Now I'm leaving it overnight for the glue to dry before moving on to the next step.
If you like the look of this project, please check out my etsy store to see the patterns I have available for steampunk style craft projects.

Monday, August 27, 2012
Add to your reading list...

Friday, August 24, 2012
Friday fashion: steampunk Gaultier
Tophats and tails! Have you seen Jean-Paul Gaultier's Autumn/Winter 2012/13 haute couture collection? Take particular note of the men's corset at around four minutes into the video. Or at 07.20: are those stretch velvet leggings? Bring back the codpiece, I say. Naturally, the collection finishes with an amazing wedding dress based on a white Victorian-style tailcoat worn backwards. Enjoy!
Thursday, August 23, 2012
Pandora's hatbox in leather

 The first stage in the decoration of Pandora's Hatbox is to cover it in the faux crocodile skin fabric I bought at the craft store. One tip to note when planning to use this type of vinyl fabric is that it can easily be marked by scratches in the store, and it will also develop creases if you fold it. I stored my fabric by hanging it from the clips of a skirt hanger until I was ready to use it, but you could also wrap it around a cardboard mailing tube.
After you've carefully measured the box you want to cover, you can mark the pieces on the back (fabric) side of the vinyl and cut them out. I used a spray-on craft glue to adhere the larger pieces to the hatbox (the top of the lid and around the barrel).
Before I added the strip around the edge of the lid, I used a craft knife to cut four slits evenly around the edge (you can see one in the picture); this was because the lid was a pretty tight fit even before I added the vinyl covering to the barrel and I needed to make room. The slits will be hidden by the vinyl strip. I also worked around the edge of the lid with a pair of fabric shears to trim off excess vinyl, although I didn't worry too much about getting an exact fit, as the edges will be covered by the trim eventually.
 For the edge strip, I used a liquid craft glue which I spread over the back of the strip. I did this for two reasons: to ensure a stronger bond on a part of the box that will get a lot of wear and tear, and because it would have been a pain in the neck to protect the vinyl that was already applied to the lid while I was spraying adhesive.
 At the same time, I covered the small cardboard suitcase with the same vinyl fabric. This was a little trickier than the hatbox because of the handle and catch, which couldn't be removed. The excess bits of vinyl in the picture are just there to protect the finish from being marked by the bulldog clips that are holding the vinyl in place while the glue dries. I won't go into details here, but if you want tips on how I cut the vinyl to fit around the fixtures, join my email list (use the box in the sidebar) and I'll let you know when the full pattern and instructions will be available.
 Wednesday, August 22, 2012
More objects of desire
Looking for inspiration for the lining and cover of my Pandora's Hatbox, I came upon this blog. I can't read the Cyrillic captions, but the pictures are drool-worthy.
Tuesday, August 21, 2012
Pandora's hatbox
Remember the $5,000.00 Victorian leather hatbox I coveted a month or so ago? Of course I can't afford to buy it, so I've decided to make my own. At the craft store I bought a plain cardboard hatbox (and a cute little suitcase, too), then headed for the fabric counter for some faux crocodile skin vinyl and other trim and accoutrements. I may have gone a teeny bit berserk in the haberdashery section, with braid and tape and studs and so on.... I'll post step-by-step updates as I complete each stage of the construction.


Thursday, August 16, 2012
Finally, a map of the future!

 If you have been patiently waiting to see the finished Map of the Future visual journal cover, please accept my apologies. I've been unable to sit at my computer for several weeks now due to a compressed disc in my spine – ouch! The project is now finished, and I've been scribbling away in the journal with more ideas for designs and patterns while I've been ill, so please come back to this blog soon to see what's next.
After completing the embroidery of the map I had fun finding and adding the brass embellishments shown here, including the compass of cogs and watch parts, the ornate brass hinges and the hasp-and-staple lock to keep it safe.
The pattern and full step-by-step instructions are available from my etsy store, if you would like to make your own visual journal cover. And please add your email address to my mailing list using the form in the sidebar if you'd like to know when new patterns and designs are available.
Subscribe to:
Comments (Atom)